Anxious to get back to making masks. Got more material and had some on hand. While cutting out pattern my hand slipped and drew around my finger. Easy fix- just thought it was funny. I have to wait to get a lamp and comfortable seating and height of machine. Lighting sucks and my neck is troublesome.
***Bought some pillows to make sitting more comfortable. They are cheap- and what a surprise they are not flexible- they need to be broken in. I struggled on my birthday trying to get a pillow cover on and then a pillowcase over that! phew.
*so this year I am trying to stick to a way of doing it. The template is simple but the first one I attempted this year I sewed the outer curves properly then proceeded to sew it together in correctly and had to stitch rip. Had many mishaps. Bobbin running out and making a racket. Realizing I was winding the bobbin incorrectly, a threaded needle showing up coming out of the machine! good grief. Finally settled down and made 3 masks.
Cut out pattern Right sides facing sew the outer curves. #Wrong side facing you stuff the one side into the other forming a cuplike shape. Clip the edges of the curve then sew the edges leaving enough room on one edge to turn the masks inside out. Then top stitch and close that gap. Made the 4 straps first as those done last seem to take forever. 2 inch wide strips as long as the material makes it possible.
Iron in half lengthwise , then iron each side into that center then fold in half. stitch starting at an end making sure to reverse stitch twice then sew the long side and then do the same 2 reverses on the other end. This way I have less stray threads tickling my face. Then next set I may try inserting them into the sides of the masks and sewing them down that way.
that's when I realized it was wrong LOL*while I was getting acclimated to the machine etc- stuff still happens.
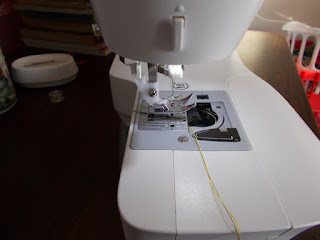
saw a lever that pulls down and says "PUSH" on it. google was no help then I watched the Singer sewing machine video yet again and it is used for button hole making. Not sure I will ever USE that feature but now I know. The other thing was- all of a sudden I saw yellow thread appear like it was coming out of the bobbin case. In watching that video it also appears that I do not have to "bring up" the bobbin thread to the top- you just start sewing. I will test this out for sure! I think I finally got the hang of the needle threader too! yay me.
step by step mask
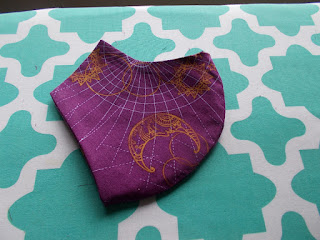
sewing the outer curves right sides together
fold it into itself and and "feather cut" the seam sewing outer edge and turning inside out through small seam opening the blasted ties were my downfall. so tedious with my hands I think I finally have the knack though one other thing I learned is that red dye in any material smells funny in a mask. So I shy away from that. I do have my skull & roses mask though for Halloween that I will suffer through. *
I think I finally have it down as a pattern to follow.
But I forgot to take a photo of the finished product
strap sew across end then down side and across other end. Ironing before and after each process seems to help. sew outside curve right sides together. then stuff the one curve into the other. Iron and clip the seams stitch the outer edges all but mmaybe 2 inchexs on bottom edge. Then turn inside out. then top stitch the edge closing the gap left to turn inside out. Then I used the stitch ripper to cut 2 slits each end. Then stuffed the tie ends into each slip and then sewed back and forth full length of each end twice to secure.
*
February 2
a Wednesday in Hyannis got these quilt squares at Joann's with Dara's gift card
February 15
I will perfect this pattern yet!
another mask
new material for masks. Made one with the black & white pattern.
won't know until I iron it and try to wear it whether the lower back straps are too short. *
straps seem fine being shorter lower back


%20(1280x971).jpg)
%20(1280x814).jpg)
.jpg)
%20(1280x961).jpg)
.jpg)
%20(1280x960).jpg)
.jpg)
%20(1280x960).jpg)
%20(1280x960).jpg)
.jpg)
%20(1280x960).jpg)
.jpg)
%20(1280x960).jpg)
%20(1280x960).jpg)
.jpg)
.jpg)
.jpg)
%20(1280x961).jpg)
%20(1280x961).jpg)
%20(1260x1280).jpg)
%20(1280x961).jpg)


.jpg)
.jpg)
.jpg)
.jpg)